Dear Academicians;
Necmettin Erbakan University Office of Big Data collects data throughout the university in areas of activity such as student experience, academic performance, research activities, resource management and sustainability, analyzes large data sets, and tries to make more informed and effective decisions by identifying trends, tendencies and relationships.
One of the fields of activity of the Coordinatorship is to closely follow the world university rankings carried out by national and international rating agencies, to analyze the performance change of the university according to the indicators of the relevant ranking approach, and to report the findings by making sense of them. These rating agencies consider the publication performance of academics as the main ranking criterion. Publication data, on the other hand, are drawn from various international databases and directories, especially Web of Science and Scopus, and then analyzed by matching them with the researcher credentials of academics.
An online platform has been developed under the leadership of our coordinatorship in order to monitor academic performance in certain periods at our university. In order for the publication data to be processed effectively and efficiently on the platform, our academicians need the following researcher credentials (IDs that identify the academic identity):
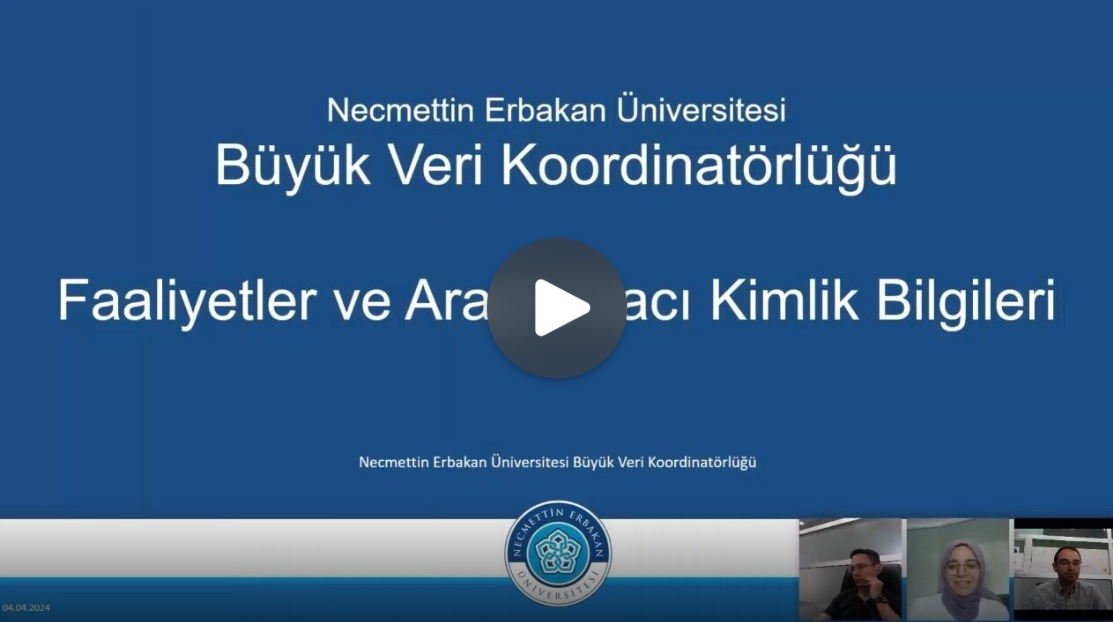
Click here to watch our webinar recording dated 04.04.2024, which includes a detailed explanation:
Guide to Obtaining Researcher Credentials:
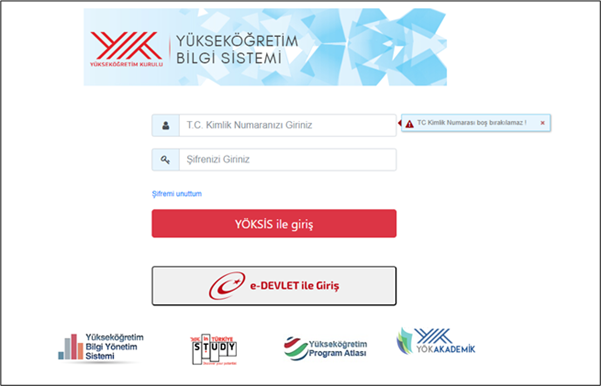
I.YÖKSİS Researcher ID and YÖK Academic Page Link
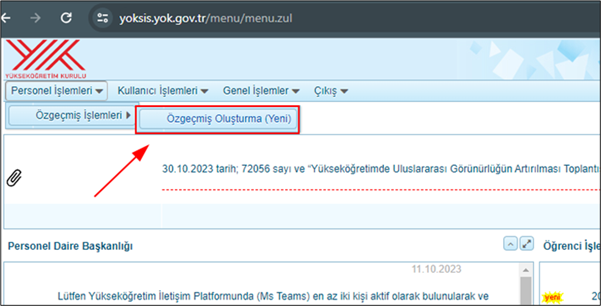
Step 1
Log in to the system at https://yoksis.yok.gov.tr/ and verify your identity information.
Step 2
From the top left menu, go to “Personnel Operations” >>> “CV Operations” >>> “Create CV (New)” screen.
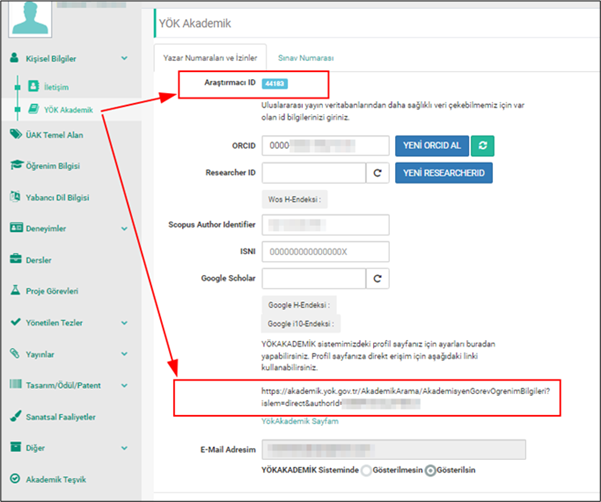
Step 3
On the page that opens, click on the “YÖK Academic” menu under the “Personal Information” section on the left. At the top of the screen that appears on the right, you will see your Researcher ID. At the bottom of the same page, you can also access the link to your YÖK Academic Profile Page.
Please make a note of both pieces of information.
II.ORCID Account Creation Process
As is known, researcher identification numbers are used to prevent certain issues arising from name/institution similarities in the scientific studies of researchers, scientists, and academics. Within the scope of the work carried out in cooperation between TÜBİTAK ULAKBİM and the Council of Higher Education (YÖK), it has been decided to use ORCID information. In this context, it is recommended that article authors include their internationally recognized ORCID information in their publications.
With the update of the TR Dizin journal evaluation criteria in 2018, the inclusion of ORCID information in journals has been added as a criterion.
When searching for publications/citations based on author names, problems may arise due to name similarities, surname changes, names containing Turkish characters, different spellings, or institutional changes. Therefore, it is important for researchers to obtain a unique identifier/number (ID).
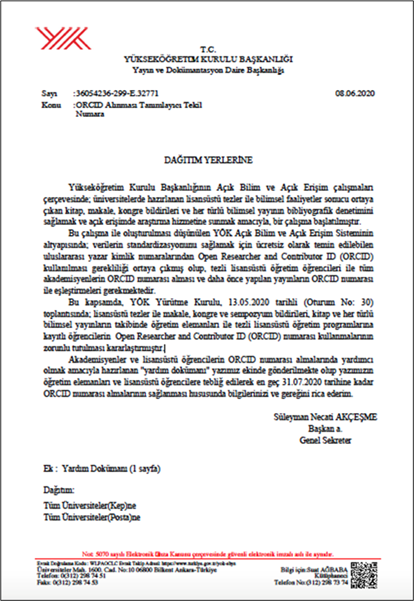
Within the infrastructure of YÖK's Open Science and Open Access System, the necessity to use the Open Researcher and Contributor ID (ORCID) — an internationally recognized and free-to-obtain author ID — has emerged in order to standardize data. Graduate students enrolled in thesis-based programs and all academic staff are required to obtain an ORCID number and match it with their previously published works.
In this context, during the meeting of the YÖK Executive Board held on 13.05.2020 (Session No: 30), it was decided that faculty members and graduate students in thesis-based programs must use an Open Researcher and Contributor ID (ORCID) number in the tracking of theses, articles, conference and symposium papers, books, and all types of scientific publications.
ORCID (Open Researcher and Contributor ID)
ORCID is a free digital identifier that helps overcome issues such as name similarities, surname changes, or problems with Turkish characters for academics and researchers. It also facilitates the collection of all an author's works under a single identity.
ORCID is a 16-digit URI compliant with the ISO Standard (ISO 27729), also known as the International Standard Name Identifier (ISNI).
You can create a free ORCID registration at http://orcid.org.

It was established as the result of a collaborative initiative launched with the support of various publishers and stakeholders. The main goal is to gather all research outputs of a researcher under a single account by using a single digital identity. Additionally, ORCID facilitates interoperability between systems and offers application programming interfaces (APIs) that allow for identity verification.
Registering with ORCID:
You can register with ORCID easily and for free, compile your publications in one place, and search among other registered scientists and researchers.
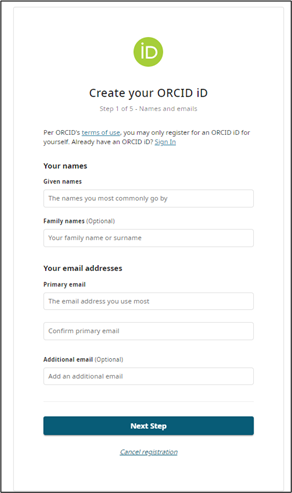
1 - Registration Link:
Fill out the form at https://orcid.org/register. You can complete the registration in just a few minutes.
Registration screen preview:
After completing your registration, you will be redirected to the main menu.
Through the page that appears, you can update your personal information (such as name variations, country, keywords, website, email address) and fill in sections related to your biography, employment history, funding received, and research works.
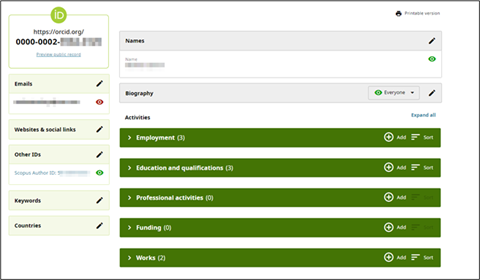
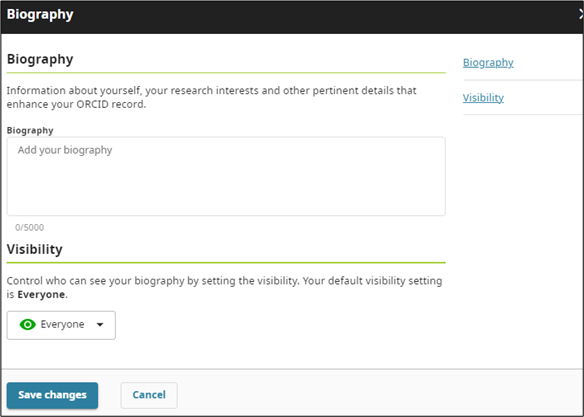
2 - Biography:
By clicking the pencil icon, a window will open where you can enter information about yourself.
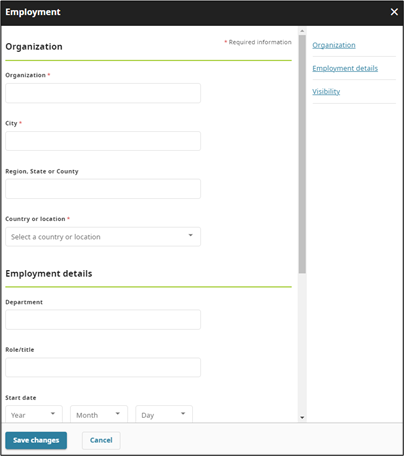
3 - Employment:
To add information about the institution(s) where you have worked, click the "Add" button. This will take you to the screen shown below, where you can enter all relevant details about your employment.
4 - Education & Qualifications:
To add information about your education and qualifications, click the "Add" button.
Use the "Add Education" section to enter your educational background, and the "Add Qualification" section to include your professional qualifications.
 5 - Professional Activities:
To add relevant information, click the "Add" button, and you can include details about your professional activities. In this section, you can add information about activities where you participated as an invited speaker, organizations you belong to, awards you’ve received, etc.
6 - Funding:
This section is used to add grants, awards, and other funding you’ve received to support your work. To add this information, you can use the "search & link" tab or click "Add manually" and fill in the relevant fields in the window that appears.
7 - Works:
You can add your academic works by clicking the "Add" button on the right. There are 5 different ways to add your works:
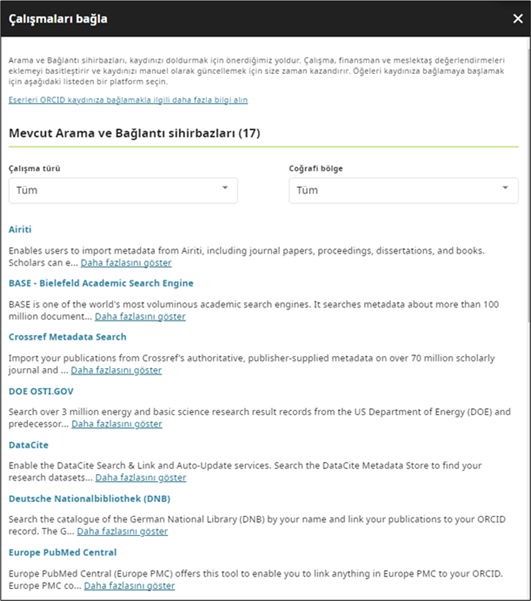
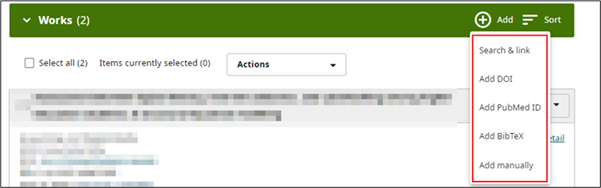 Search & Link:
When you click the "Search & link" button, a screen will appear showing a list of institutions that ORCID collaborates with for bulk publication addition. You can select the ones you wish, allowing you to add your publications in bulk.
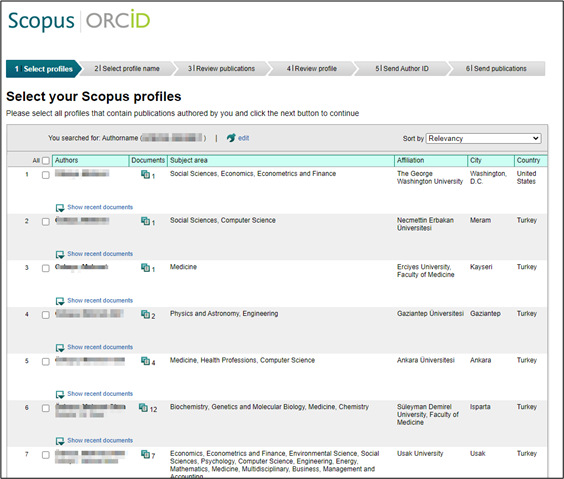
For example, in this section, if you select "Scopus - Elsevier" to transfer your publications from Scopus, the next screen will prompt you to click "authorize." Once authorized, publications registered under your name (or similar publications) will appear. After selecting your publications, click the "Next" button, and your profile name will be displayed.
Profile Name Display:
You can make changes to how your profile name is displayed according to your preference. In the next step, your works will be listed individually, and you will be asked to confirm them.
In the "Send Author ID" step, after entering your institutional email address twice, your records and Author ID number will be transferred to ORCID. You can return to ORCID by clicking the "Return to ORCID" link to check your publications.
I.Add DOI:
You can find a publication by typing its DOI number in the search box. If your publications have DOI numbers, you can also use "CrossRef Metadata Search" (https://search.crossref.org/). After clicking the "Authorize" button, a list of publications linked to your name will appear. For your publications, click the "Add to ORCID" link under each publication and select "Yes" if you wish to add the publication to your ORCID profile. After adding, the publication information will change to "In your profile".
II.Add PubMed ID:
You can write or paste the full PubMed URL or just the identifier to transfer your PubMed publications.
III.Add BibTeX:
You can add your works by uploading BibTeX files exported from indexing platforms such as Google Scholar. For publications in DergiPark, it is possible to export in BibTeX and RIS formats.

IV.Add Manually:
By clicking the "Add manually" option, you can manually add your publications by filling out the relevant fields in the window that appears.
III. Web of Science Researcher ID
As of May 2019, our university has collaborated with Clarivate Analytics to provide bibliometric analysis of publications in journals scanned by Web of Science. In order to analyze the publications of our university scanned by Web of Science in a healthier way, all academic staff at our university are required to get ResearcherID. There are problems in accessing all publications of an academic collectively due to similarities in some author names, changes in the surnames of female researchers due to marriage and differences in the methods of giving names. As a result, accurate data cannot be used in the management of scientific outputs, and analyzes to be made about an author or the institution he / she is affiliated with give erroneous results.
Why is ResearcherID Important?
- Ability to view a researcher's work collectively,
- Using the right data in bibliometric analysis,
- Evaluating the productivity of researchers for institutions,
- It is important for revealing the added value provided to the organization.
For this reason, our researchers who do not have a ResearcherID should follow the steps below to create a ResearcherID account and get their own ID.
To ensure standardization in the ResearcherID creation phase;
Necmettin Erbakan University from the Institution field,
In the Sub-organization/Department field, you need to select your own faculty and department (the open faculty-department names in English as indicated in the list) and after the IDs are created, you need to add your own publications to the ResearcherID account.
Getting a ResearcherID for the first time:
If you have already had a publication such as a book, book chapter, paper or article indexed by Web of Science (WOS), an automatic Researcher ID has been created for you. This must be confirmed first. Follow the steps below to access the ID.
Step 1
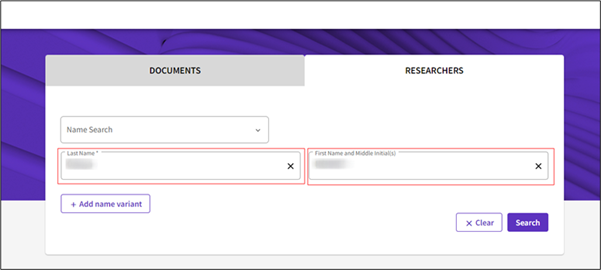
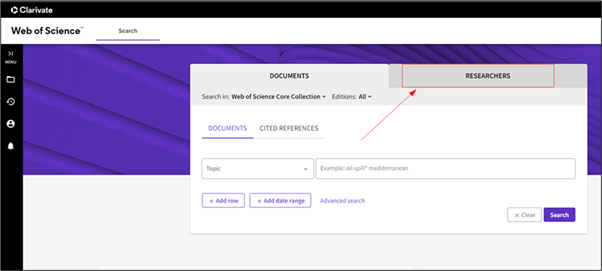
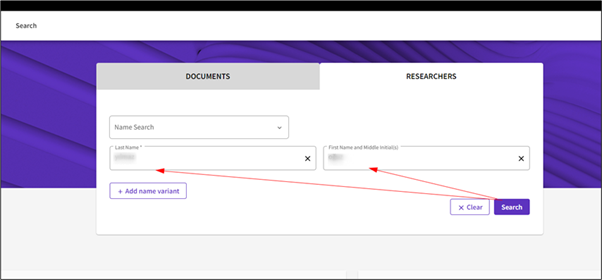
First of all, go to https://www.webofscience.com/wos/author/search. After clicking on the “Researchers” menu, enter “author last name” and “author first name” in the search boxes. After entering the information, click on the “search” button.
Step 2
Similar names and publications will be listed on the screen that appears. Find your name by comparing the publication and author names and click on your name.
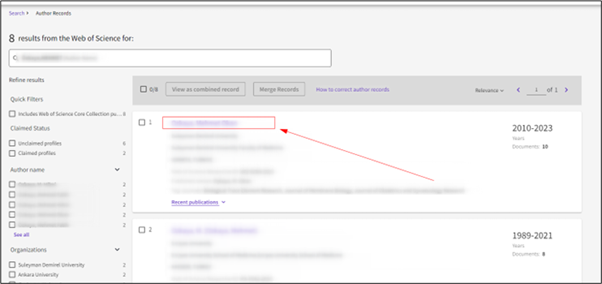
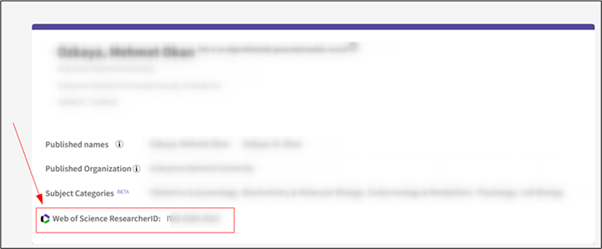
Step 3
On the author profile page that opens, your ResearcherID will appear next to the “Web of Science ResearcherID” heading.
Step 4
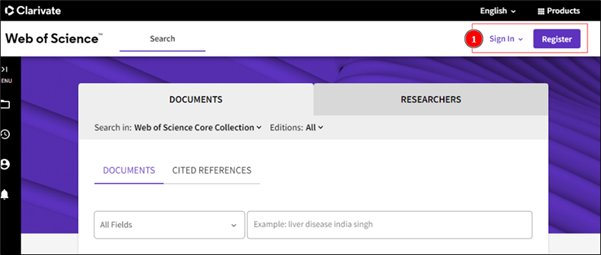
If you have not registered to the WOS system before, go to https://www.webofscience.com/. Register a new researcher from the “Register” menu and enter the system.
Step 5
Then click on the “My Web of Science” menu on the left side and select the “Profile” tab from the submenu. From here, click on the “My researcher profile” menu.
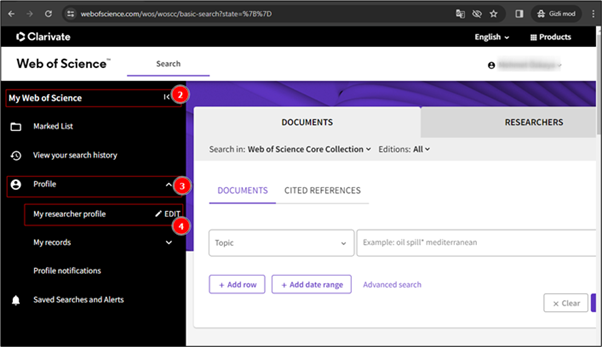
Step 6
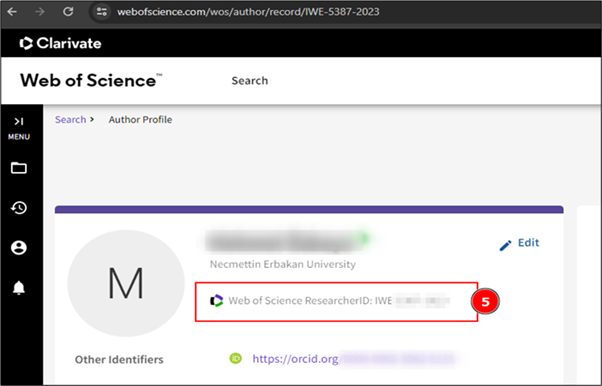
Web of Science ResearcherID information is accessed from the window that opens on the right. Note: Even if any of your publications have not been indexed by WOS before, you will be assigned an ID when you register to the system.
Web of Science ResearcherID Author Merge
Step 1
If you have more than one ID definition, you need to deduplicate (merge) them. For this, you must first log in to your Web of Science account. Go to https://www.webofscience.com/. Log in to the system from the “Sign in” menu on the top right. Click on the “Researchers” tab on the page that opens.
Step 2
Enter “author surname” and “author name” in the search boxes and click the search button.
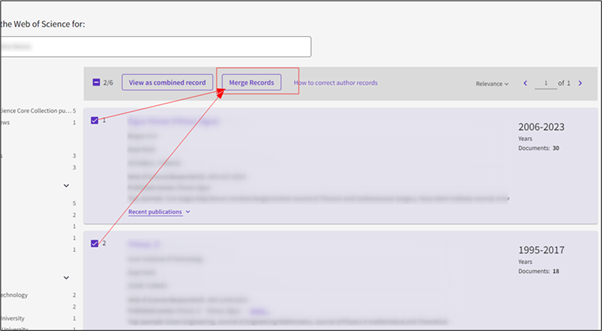
Step 3
Check the boxes next to the profiles listed and click on the “Merge Records” tab to complete the necessary procedures. After filling out the contact form, the merge request will be sent to the other party for review. The result of the merger will be notified to your registered e-mail address.
IV.Scopus Author ID
Step 1
If any of your publications as an author are not indexed by Scopus, you do not have a Scopus Author ID. However, if your publications such as books, book chapters, proceedings and articles are indexed by Scopus, your automatic Scopus Author ID has been created. Please follow the steps below to access this ID.
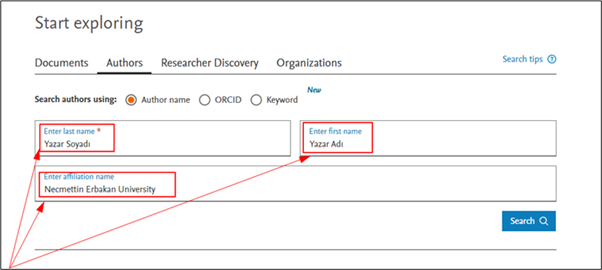
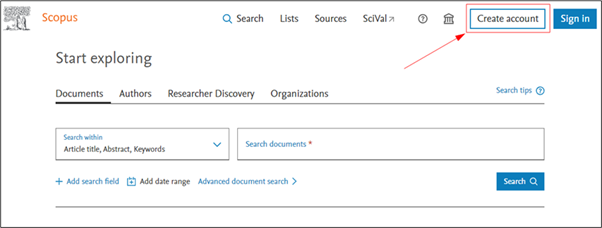
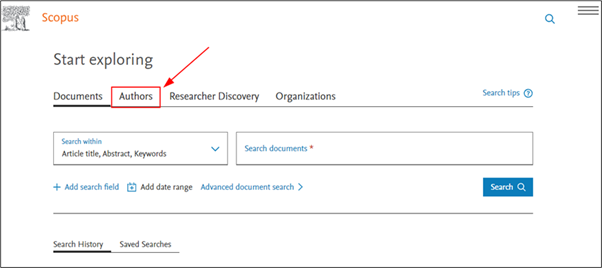
First of all, go to https://www.scopus.com/. Select the “Authors” option under the “Start exploring” heading.

Step 2
After clicking on the “Authors” menu, enter “author surname” and “author name” in the search boxes that appear. At the bottom, click on “Add affiliation” and enter the institution information as “Necmettin Erbakan University”. If you have published with the information of another institution, you can enter the information of the previous institution. Depending on the situation, this section can be left blank. After entering the information, click on the “search” button.
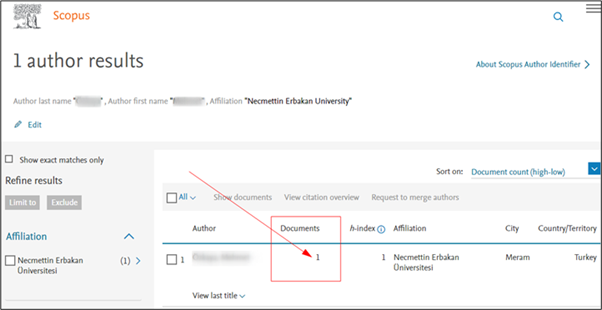
Step 3
If a publication has been made in a book, conference or journal indexed in Scopus, the search result will list the publications of the relevant author. At this stage, if there are similar author names, they can also be listed. It is seen that similar author names appear especially in searches without specifying the institution.
Find your name on the screen that appears and click on the number of publications under the “Documents” heading on the same line.
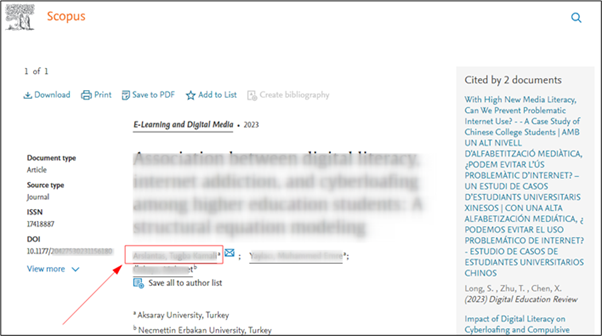
Step 4
Then enter one of the publications. Click on the author name under the title of the publication.
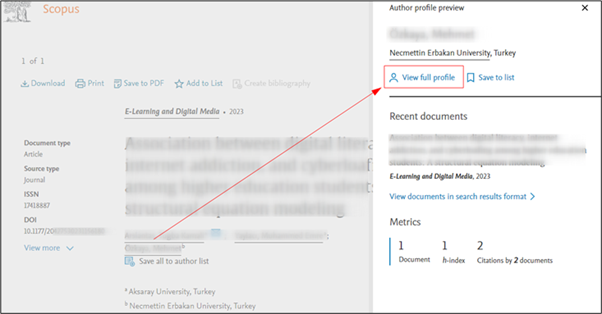
Step 5
In the previous step, click on the author name under the publication title and the author profile panel will open on the right. Click on “view full profie” in the panel.
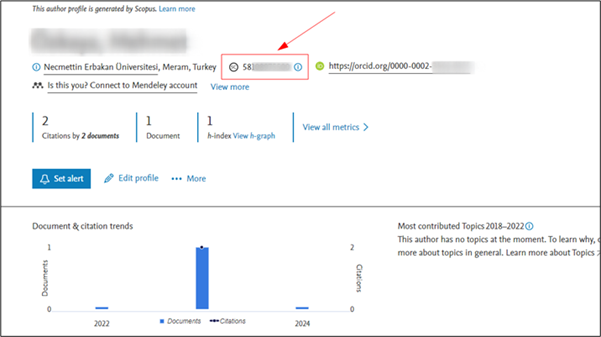
Step 6
In the window that opens, you can access the Scopus Author ID in the area indicated by the arrow. In summary, you must first access your own publication from the Scopus publication search section. Then you can access the relevant Scopus Author ID by clicking on your author name under the publication title.
Important Reminder: If any of the author's publications are not indexed by Scopus, they do not have a Scopus Author ID.
Scopus Author Merge
Step 1
If you want to request changes to your profile or if you have more than one ID, you need to deduplicate (merge) them. For this, you must first create a Scopus account. Go to https://www.scopus.com/. Click on the “Create Account” menu on the top right and create a membership.
Step 2
If you have more than one Scopus ID number, to combine all numbers under a single ID, first log in to the system and then click on the “Authors” tab on the Scopus home page. Search again by typing your last name and first name.
Step 3
If you are sure that you own all of the articles in the author in the results, check the boxes next to the profiles you want to merge and click on the “Request to merge authors” tab.
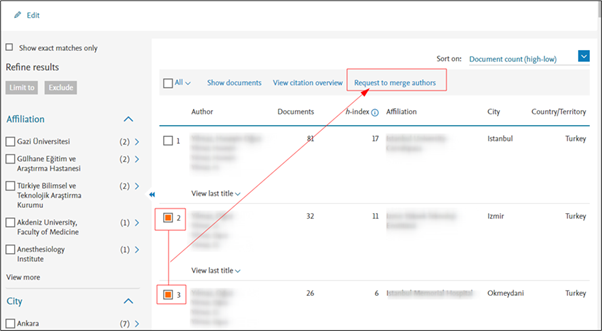
Step 4
When you click on the “Request to merge authors” tab, the information about which fields you can change is displayed on the screen. After selecting your preferred author name, continue and confirm the process.
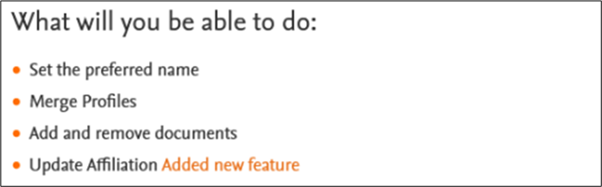
On the screen that appears after the confirmation process, you need to select the author profile and identify the publications that belong to you. You can remove publications that do not belong to you by selecting them in this field.
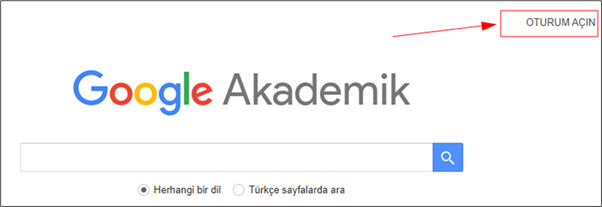
V.Google Scholar Link
Step 1
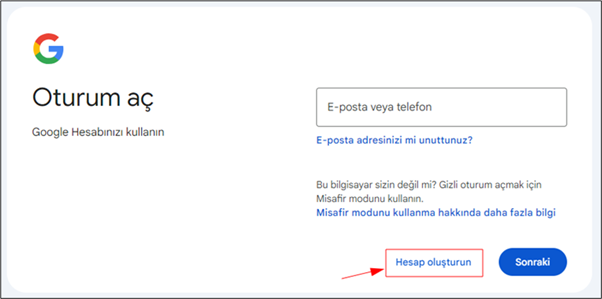
Click on the link https://scholar.google.com.tr/. If you have a Google account, click Sign in. Log in to the system by entering user information.
If you do not have a Google account, create a new account by clicking “Create Account” and fill in the required information.
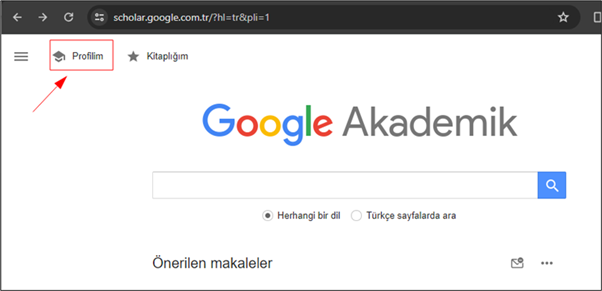
Step 2
After creating a Google account, log in to the system. Click on the “My Profile” menu at the top left.
Step 3
If a Google Scholar profile has not been created before, the profile is created by entering information in the sections below.

Step 4
After the Google Scholar profile creation process is completed, go back to the home page (https://scholar.google.com.tr/). Click on the My Profile menu.

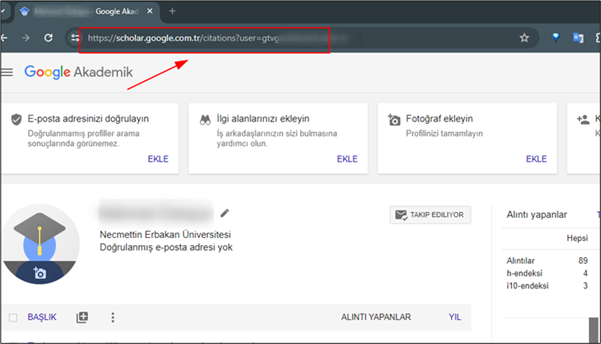
Step 5 (Finding the Google Scholar Link)
In the window that opens, the information in the address bar shows your “Google Scholar Link”. Please note this link.
Make sure that the link is in https://scholar.google.com.tr/citations?user=... format.
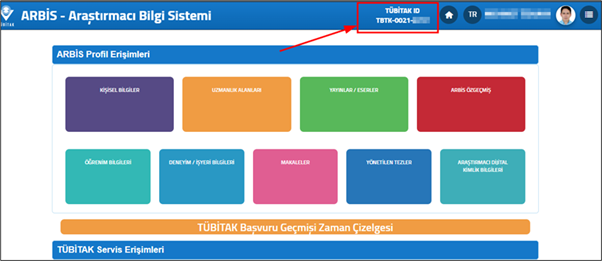
VI: TÜBİTAK ID
It is the ID required to take part in TUBITAK projects.
Step 1
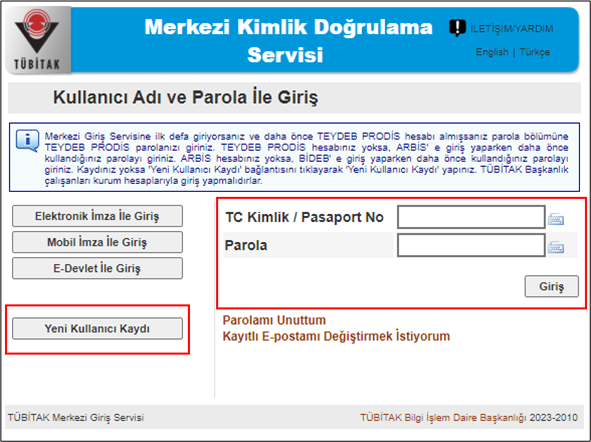
Enter the Researcher Information System (ARBIS) address (https://arbis.tubitak.gov.tr/). Click on the “Login to ARBIS” menu from the top right menu.

Step 2
In the window that opens, enter your user information and click the login button. If you do not remember whether you have been a member of the ARBIS system before, first try the Forgot password option on the right side. If you are not registered, you can click on the New User Registration menu on the left side.
Step 3
After logging into the system, you can access the TUBITAK ID starting with TBTK at the top of the window that opens.